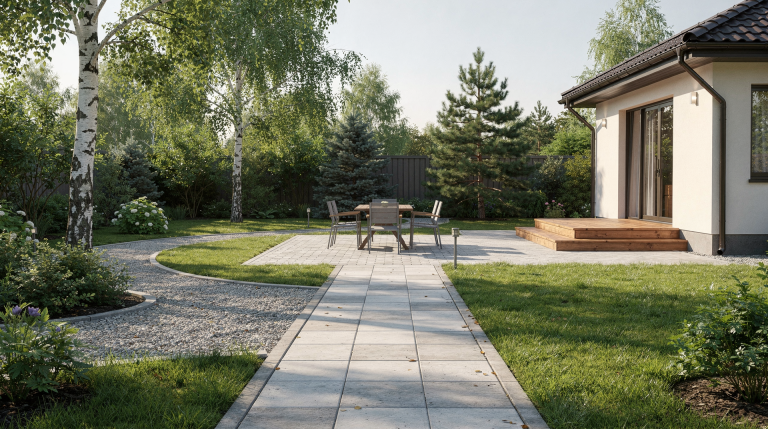
ADFS – How to enable Trace Debugging and advanced access logging

Dieser Beitrag wurde am 18.11.2015 um 22:38:18 in Cloudy Migration Life veröffentlicht

ADFS – How to enable Trace Debugging and advanced access logging
Debugging an Active Directory Federation Services 3.0 farm together with the Web Application Proxy servers in front can be a very complex task when you think of all the different constellations that can be served by this technology. Especially when it comes to access from mobile devices and Microsoft Online as relying Party.
In principle, trace debugging can have 3 target scopes:

  • Trace debugging on the backend – on WAP servers and ADFS servers to see how the authentication request is terminated
  • Trace debugging on the accessing device – to see how the authentication request is initiated
  • Network trace to see the authentication flow travels from device to the ADFS farm and back. Actually you need to terminate the SSL connection with a special tool like Fiddler to inspect the content.

For many professionals the Fiddler trace will be the most complex way to start debugging, especially when you are acting in secured and controlled enterprise network. Many apps on mobile devices (e.g. the Office Apps for Android) also show poor logging and tracing capabilities to show what the app is actually doing in terms of federated authentication.

Therefore, we should utilize the complete debugging capabilities of ADFS as preferred option. As long as there is a communication between device and WAP/ADFS servers, we fortunately receive a lot of information from the Trace logs of the backend servers.

STEP 1: Set Trace level and enable ADFS Tracing log:
Please enable the debugging logging on the ADFS 3.0 Server:
Open an elevated CMD window and type the following command: C:Windowssystem32>wevtutil sl “AD FS Tracing/Debug” /L:5

In Event Viewer highlight “Application and Services Logs”, right-click and select “View – Show Analytics and Debug Logs”

In Event Viewer highlight “Application and Services Logs”, right-click and select “View – Show Analytics and Debug Logs”
Navigate to AD FS Tracing – Debug, right-click and select “Enable Log” to start Trace Debugging immediately.


Navigate to AD FS Tracing – Debug, right-click and select “Disable Log” to stop Trace Debugging.
It is difficult to scroll and search in the events page by page in the Debug Log. Therefore save all Debug events into an *.evtx file first.


Open the saved log again. Now you can scroll and search a lot smoother through the events.

STEP 2: Enable Object access auditing to see access data in security logs:
If we want to see exhausting data about access activities on the ADFS servers we have to tun on object access auditing (not account logon auditing). You have to enable auditing in 2 locations on the ADFS server.

  1. Turn on auditing in the ADFS GUI. On the primary ADFS server right-click on Service and activate “Success audits” and “Failure audits”. This setting is valid for all ADFS servers in the farm.
  2. To make this setting actually work, you have to do a second step on the ADFS server in the Local Security Policy (unless there is a similar Group Policy setting coming from the Active Directory structure).
    Open the GPO Editor, navigate Computer ConfigurationWindows SettingsSecurity SettingsLocal PoliciesAudit Policy and configure “Audit Object Access” with “Success” and “Failure”. This setting has to be made in the Local Security Policy on each ADFS server (or a GPO is set on OU or different level in Active Directory).
  3. Looking at the security event logs of the ADFS servers, you will notice a much higher amount of events coming in which provide a much higher level of insights.

It is a good starting point to exactly note the time when running e.g. an access attempt and then look up the timestamps (+ offset for runtime) in both event logs, ADFS Trace Debugging and Security.


“Missing-Partition-for-run-step” error when starting first Import job in Microsoft Azure AD Sync

After installing the latest Version of Azure AD Sync we received the error “missing-Partition-for-run-step” in the Operation pane of the Synchronization Service Manager when trying to start the Full Import as very first step in our Run Profile.

The error only shows up when both is true:

  • The AD Forest as source of the Synchronization is a multi-Domain Forest
  • You configured the Azure AD sync to synchronize not all Domains of the Forest

By default the Azure AD Installation procedure creates a default run profile that includes all partition (domains) for the Import, while we filtered out the root domain in the Connector configuration.
To resolve the problem you need to clean up the Run Profile created by the Azure AD Sync wizard automatically. From Connectors pane select “Configure Run Profiles” and delete the run steps that include the unwanted “domains”. After the cleanup, you will successfully run the Import job.

New Release of DELL Migration Manager for Exchange 8.11

While we were all waiting for the arrival of Migration Manager for Exchange 9.0, DELL Software released a new version 8.11 of its Exchange migration flagship.

New in the release 8.11 is the support for installing the Migration Manager components on Windows Server 2012 and 2012 R2 OS platforms. On the other hand, installations on Windows Server 2008 and Windows 7 are not supported anymore:

  • Migration Manager supports migration from the source Exchange 2013 organization to the target Exchange 2010 or Exchange 2013 organization using Native Move Job.
  • All Dell Migration Manager components can now be installed on Microsoft Windows Server 2012 and Microsoft Windows Server 2012 R2
  • Operating systems not supported from Migration Manager console:
    – Microsoft Windows Server 2008 Service Pack 1 or higher (x86 edition)
    – Microsoft Windows 7 Service Pack 1 or higher (x64 edition)
    – Microsoft Windows Server 2008 Service Pack 1 or higher (x64 edition)
    – Microsoft Windows 7 Service Pack 1 or higher (x86 edition)
  • Operating systems not supported from Migration Agent for Exchange:
    – Microsoft Windows Server 2008 Service Pack 1 or higher (x86 edition)
    – Microsoft Windows Server 2008 Service Pack 1 or higher (x64 edition)
    – Microsoft Windows 7 Service Pack 1 or higher (x86 edition)

You can find a complete list of changes and release related information of the product here:

https://support.software.dell.com/download-install-detail/5775891?prodjid=1-7GCB8-249&utm_campaign=42330-32498-SU-GL-MigrationManagerforExchange&utm_medium=email&utm_source=Eloqua

Recommended Blog Post: The good, the bad and sIDHistory

Based on various experiences with Exchange 2010 behavior after an Exchange and Active Directory Inter Forest Migration, Exchange PRO Ingo Gegenwarth published this interesting Post:

The clueless guy

This post is about my personal journey with a cross-forest migration.

When it comes to account migration there is no way to do so without sIDHistory. It would be really hard to have a smooth migration without.

By using this attribute a end-user most likely won’t experience any impact…..unless you start doing a cleanup of this attribute.

In terms of Exchange users might see something like this

Calendar_Error

or this

Inbox_Error

But what’s behind those issues and how could you mitigate this? I was part of a migration, where those issues popped up and I’m going to describe how you could determine possible impact for end-users before it happens.

View original post 3,675 more words

Exchange Migration first & Mailbox Folder Permissions

In many inter forest migration projects, the mailbox migration to the new Exchange Organization into the new forest is performed first and the user migration is performed in a separate step at a later time. After the mailbox migration and before migrating the user objects, you have a classic Resource Forest scenario. Users are created as disabled user accounts in the target forest, receiving a linked mailbox, connected to the source Active Directory user. Important AD attribute in this scenario is msExchMasterAccountSID. This attribute of the disabled target user object holds the objectSID of the source user account. This allows to connect to the own mailbox and shared mailbox resources (Delegate permissions etc.) with the active source user object.

ExMigirst01

Did you ever thought about mailbox folder permissions in this scenario? 

For every migrated folder permission (e.g. with QMM for Exchange) and also every time a user manually adds mailbox folder permissions for another (not Active Directory migrated) user in the target mailbox, the SID of the source user object is added to the mailbox folder permissions. In this example, we’ve selected the not migrated user UserA from the Global Address list and added him as delegate for the Inbox and the calendar for the Info MBX:  ExMigirst02

At some point, the Active Directory migration will start. During this process, the user account in the target domain will be activated and the Linked Mailbox is converted to a User Mailbox. This action will clear the attribute msExchMasterAccountSID. This is necessary because the target account will now be used to access the own mailbox and resources of other mailboxes. If a migrated user is now added to the mailbox folder permissions, the target SID will be added and no longer the source SID. Let’s use the mailbox example above and add the migrated user UserB as additional delegate for the Calendar of the Info MBX:ExMigirst03

In this example, UserB will of course not have any problems accessing the Info MBX. But what happens if UserA will be migrated and the user starts accessing the Info MBX with TARGETDOMAIN\UserA? The SID of the target account has no permissions on the Inbox and the Calendar folder. Will UserA loose access to these folders now? Generally, the answer is YES, UserA will lose access! But…

In Active Directory Migration projects, it is best practice to migrate the SIDHistory to the target user account. In this case, the objectSID of the source user is copied to the attribute SIDHistory of the target account. For our example, it means that UserA will not lose access to the Info MBX because his Access Token contains the Source SID which has permissions on the Inbox and Calendar folder in the Info MBX.

SIDHistory CleanUp & mailbox folder permissions?

Clearing SIDHistory is part of most of the migration projects. Before clearing the SIDHistory attribute of the target accounts, it is required to replace the source SIDs with the corresponding target SIDs inside the mailbox folder permissions. This process is called ReACLn. Without this action, many users will lose access to shared mailbox resources when the SIDHistory attribute is cleared.


Exchange Processing Wizard (Part of Dell Migration Manager for Active Directory)

Dell migration Manager for Active Directory contains the Exchange Processing Wizard. This wizard is able to replace existing source SIDs with the matching target SIDs for permissions inside the exchange environment. The wizard is using the matching information in the QMM AD LDS database, created during the directory synchronization.

To ReACL permissions inside the mailboxes, we have to select the option “Update client permissions”:

ExMigirst04

Now we can choose to process all Public Folders and Mailboxes or select individual Mailboxes or Public Folder or even skip Public Folders or Mailboxes completely:

ExMigirst05

The wizard provides the possibility to only process one server or process multiple servers in parallel.

Known limitation of the Exchange Processing Wizard:

The wizard is unable to set the Free/Busy permissions Free/Busy time, subject, location. After processing, the permission is changed to Free/Busy time only:

ExMigirst06


Good to know – Check real SID behind folder permissions

Get-MailboxfolderPermission: Unfortunately, as long as the SIDHistory is set for a user, Exchange will always resolve the permissions to the target account. So Exchange will always show the TARGETDOMAIN\User although in fact the source SID has permissions on the mailbox folder. You will also see the same result if you query folder permissions via EWS (e.g. with EWSEditor).

MFCMAPI:

To check which SID is really behind the permission, you can use MFCMAPI to access the mailbox.

  1. Create a new profile for mailbox and disable Exchange Cached Mode.
  2. Start MFCMAPI
  3. Click Session->Logon and choose the profile you’ve created in step 1.
  4. Double Click the Mailbox entry and now navigate to the folder for which you want to display the permissions.
  5. On the right side, now double click PR_NT_SECURITY_DESCRIPTOR

In the Smart View, you can see which SID is really behind the Access Control Entry.