Tool Factory: Release of PS-REPADMIN 1.9

PS-REPADMIN 1.9 is available now. PS-REPADMIN helps to view object metadata and attribute values in a simple table view.
We made several improvements in 1.9, especially for comparing groups with their metadata between trusted Active Directory domains. The tool also provides now an easier look on Proxy Addresses and Linked Attribute values.

PS-REPADMIN 1.9 was tested with Windows 10, Windows Server 2012 R2 and Windows Server 2016. Usage is on own risk. All rights reserved by Silverstar Consulting GmbH.
Download here to test the trial version for free.
(Note: After download, unzip the file and after that rename the .zip extension to .exe)

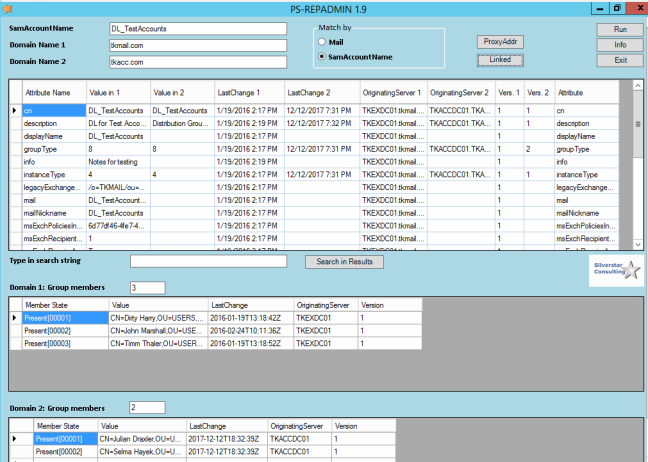
Full table view on attributes and their last change including group member values. The parallel listing makes it easy to compare values of objects from different domains.

Linked attributes are displayed in a separate view for easier comparison.

Download here to test the trial version for free.
(Note: After download, unzip the file and after that rename the .zip extension to .exe)

Access Control Policies and Issuance Authorization Rules in ADFS 4.0 – Part 1

Windows Server 2016 ships with version 4.0 of Active Directory Federation Services (ADFS), which turns out to play a bigger and bigger role in providing SSO capabilities for companies using the Azure Cloud Services. Watch the Ignite 2017 session of Principal Group Program Manager Sam Devasahayam from the Microsoft Identity Divison for more information about new ADFS extensions like “Hello for Business” or the Azure Stack support for ADFS.

https://channel9.msdn.com/Events/Ignite/Microsoft-Ignite-Orlando-2017/BRK3020

One of the most important changes when comparing ADFS version 3.0 of Windows 2012 R2 with ADFS 4.0 of Windows 2016 are the Access Control Policies, which act now as the standard method of granting access, while we no longer see the Issuance Authorization Rules of ADFS 3.0 in the AD FS GUI by default.

However, ADFS 4.0 still supports Issuance Authorization Rules. This post will show how they can be used with ADFS 4.0 and why it makes sense.

Let’s first have a quick look on the modern easy way of granting access by using Access Control Policies:

ADFS 4.0 Access Control Policies

Access Control Policies in ADFS 4.0 allow to configure access to a Relying Party Trust via ADFS authentication based on several criteria.
You can either create Access Control Policies directly adding a new Access Control Policy in the Access Control Policy Container of the AD FS Management GUI (like stand-alone without connecting it to Relying Party Trust) or you can create it when creating the Relying Party Trust. The same functionality can be achieved via Powershell by using the appropriate ADFS commandlets.
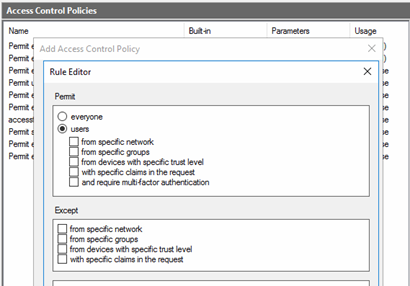
Rule Editor of Access Control Policies

You can only assign one single Access Control Policy to one Relying Party Trust, but the Access Control Policy itself can consist of several rules, which are all “Permit” rules. Inside the rule, you can select multiple conditions, which are connected by, AND operators and multiple “except conditions that are connected by OR conditions.
Example for a Policy statement:
Permit users who access ADFS from a specific network AND who are member of a specific group, but even if those conditions are met, deny (Except) access when users are member of a deny group OR when users connect from devices with wrong trust level.

No matter how many rules are defined in an Access Control Policy – as long as the requesting user and device meet the conditions of one of these rules, the policy is valid and ADFS will grant access. If no condition is met, users are not allowed to use the Relying Party Trust and therefore are “denied”.
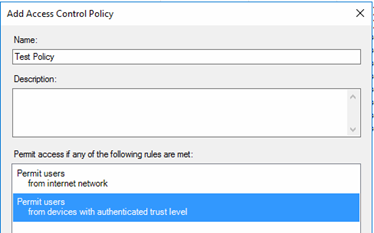
Multiple Rules in Access Control Policy

Some of the rules allow us to use parameters instead of defined values when creating an Access Control Policy. By doing this, we create rather an Access Control Policy template than a finalized Access Control Policy. Templates give us the advantage, that we can assign the same Access Control Policy to multiple Relying Party Trusts and still use different settings.
In the list view of the Access Control Policy container, you can see in the third column which Access Control Policies are parameterized and which are not. One of the pre-defined templates is based on group membership. The name of the group cannot be set in the template itself, but when it is assigned to a Relying Party Trust.

Access Control Policy with parameters in rule

Assigning the Control Access Policy to a Relying Party Trust allows replacing parameters by selecting groups from Active Directory.
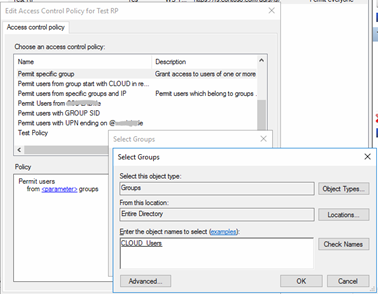
Replacing the parameter placeholder by selecting groups

Another special type of rule in an ADFS Access Control Policy is to permit users (or devices) “with specific claims in the request”.
Based on an incoming claim you can decide by various operators including regex matching, who will get access by this rule.
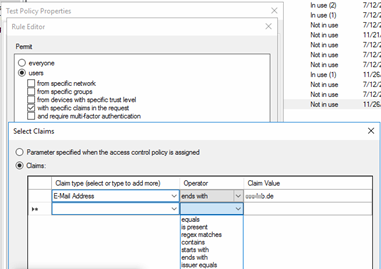
Permit Rule for filtering on specific claims

You can only use claim types that are defined by your incoming claims. For example, if you want to filter by e-mail address suffix, you have to be sure that claim type E-Mail Address is part of the incoming claim. Therefore, this special rule depends heavily on the resource’s (cloud application) behavior in sending incoming claims.

Assigning and Removing Access Control Policies

You can create a Relying Party Trust with the AD FS Management GUI without assigning an Access Control Policy at all, but you cannot remove an existing one from a Relying Party Trust completely by using the GUI. You only can edit and replace by another one. However, the ADFS Powershell commandlets provide a way to achieve that and we described it in part 2 of this blog post.

Be aware, as long as you do not assign an Access Control Policy to a new Relying Party Trust, access to the Relying Party Trust is denied for all users automatically.

Access Control Policies vs. Issuance Authorization Policies

Overall, Access Control Policies are a very handy and administrator-friendly way of configuring complex access structures for securing Relying Party Trusts.
However, the rule editor does not allow you to make extended filters based on group names other than selecting specific group names one by one, which is too static for many Cloud scenarios.
We often see the case where all users should have access to a SAML Cloud Application whenever they are member of special Cloud security groups that start or end with a special syntax.
To fulfill such a request, using the Claim Rule Language with Issuance Authorization Rules is pretty much straightforward and very flexible when adding multiple conditions. We will show the advantages of Issuance Authorization Rules by playing the following use case:

Use Case Example:

All users who are member of any security group starting with CLOUD_ should get access to the Relying Party Trust (and get authorization for the Cloud application). If they are also member of any group starting with DE_, they should get a denial for that Relying Party Trust. Additionally, access is limited only to users who connect from inside the corporate network

By default, for Relying Party Trusts created in ADFS 4.0 / Windows 2016 the Issuance Authorization Rule interface is not available in the GUI. Nevertheless, there is a way to switch over and we will explain that in post “Access Control Policies and Issuance Authorization Rules in ADFS 4.0 – Part 2”.
Exchange Migration first & Mailbox Folder Permissions

In many inter forest migration projects, the mailbox migration to the new Exchange Organization into the new forest is performed first and the user migration is performed in a separate step at a later time. After the mailbox migration and before migrating the user objects, you have a classic Resource Forest scenario. Users are created as disabled user accounts in the target forest, receiving a linked mailbox, connected to the source Active Directory user. Important AD attribute in this scenario is msExchMasterAccountSID. This attribute of the disabled target user object holds the objectSID of the source user account. This allows to connect to the own mailbox and shared mailbox resources (Delegate permissions etc.) with the active source user object.

ExMigirst01

Did you ever thought about mailbox folder permissions in this scenario? 

For every migrated folder permission (e.g. with QMM for Exchange) and also every time a user manually adds mailbox folder permissions for another (not Active Directory migrated) user in the target mailbox, the SID of the source user object is added to the mailbox folder permissions. In this example, we’ve selected the not migrated user UserA from the Global Address list and added him as delegate for the Inbox and the calendar for the Info MBX:  ExMigirst02

At some point, the Active Directory migration will start. During this process, the user account in the target domain will be activated and the Linked Mailbox is converted to a User Mailbox. This action will clear the attribute msExchMasterAccountSID. This is necessary because the target account will now be used to access the own mailbox and resources of other mailboxes. If a migrated user is now added to the mailbox folder permissions, the target SID will be added and no longer the source SID. Let’s use the mailbox example above and add the migrated user UserB as additional delegate for the Calendar of the Info MBX:ExMigirst03

In this example, UserB will of course not have any problems accessing the Info MBX. But what happens if UserA will be migrated and the user starts accessing the Info MBX with TARGETDOMAIN\UserA? The SID of the target account has no permissions on the Inbox and the Calendar folder. Will UserA loose access to these folders now? Generally, the answer is YES, UserA will lose access! But…

In Active Directory Migration projects, it is best practice to migrate the SIDHistory to the target user account. In this case, the objectSID of the source user is copied to the attribute SIDHistory of the target account. For our example, it means that UserA will not lose access to the Info MBX because his Access Token contains the Source SID which has permissions on the Inbox and Calendar folder in the Info MBX.

SIDHistory CleanUp & mailbox folder permissions?

Clearing SIDHistory is part of most of the migration projects. Before clearing the SIDHistory attribute of the target accounts, it is required to replace the source SIDs with the corresponding target SIDs inside the mailbox folder permissions. This process is called ReACLn. Without this action, many users will lose access to shared mailbox resources when the SIDHistory attribute is cleared.


Exchange Processing Wizard (Part of Dell Migration Manager for Active Directory)

Dell migration Manager for Active Directory contains the Exchange Processing Wizard. This wizard is able to replace existing source SIDs with the matching target SIDs for permissions inside the exchange environment. The wizard is using the matching information in the QMM AD LDS database, created during the directory synchronization.

To ReACL permissions inside the mailboxes, we have to select the option “Update client permissions”:

ExMigirst04

Now we can choose to process all Public Folders and Mailboxes or select individual Mailboxes or Public Folder or even skip Public Folders or Mailboxes completely:

ExMigirst05

The wizard provides the possibility to only process one server or process multiple servers in parallel.

Known limitation of the Exchange Processing Wizard:

The wizard is unable to set the Free/Busy permissions Free/Busy time, subject, location. After processing, the permission is changed to Free/Busy time only:

ExMigirst06


Good to know – Check real SID behind folder permissions

Get-MailboxfolderPermission: Unfortunately, as long as the SIDHistory is set for a user, Exchange will always resolve the permissions to the target account. So Exchange will always show the TARGETDOMAIN\User although in fact the source SID has permissions on the mailbox folder. You will also see the same result if you query folder permissions via EWS (e.g. with EWSEditor).

MFCMAPI:

To check which SID is really behind the permission, you can use MFCMAPI to access the mailbox.

  1. Create a new profile for mailbox and disable Exchange Cached Mode.
  2. Start MFCMAPI
  3. Click Session->Logon and choose the profile you’ve created in step 1.
  4. Double Click the Mailbox entry and now navigate to the folder for which you want to display the permissions.
  5. On the right side, now double click PR_NT_SECURITY_DESCRIPTOR

In the Smart View, you can see which SID is really behind the Access Control Entry.

QMM 8.10 error: Agent is not ready to start – SCP not found

We used Quest Migration Manager 8.10 recently in a project at a customer for a combined Active Directory and Exchange migration. Overall target was to integrate a Windows 2003 domain cross forest and cross org into the central AD Forest with several child domains. Since from mail perspective our migration source was Exchange 2007 and our migration target Exchange 2013, we decided to use the Native Move Job option along with the Migration Manager for Exchange Agent (MAgE) services.

Situation:

The customer environment look like the following:
Source Domain in Single Domain Forest with Domain Controllers on Windows 2003 and Exchange 2007 as mail system.
Target Domain was one of several child domains in the central Forest. All domain controllers running Windows 2012 R2 and mail system was Exchange 2013 SP1.
All Exchange 2013 servers had been deployed to root domain which also kept all important system and admin accounts.
To limit complexity in the setup of Quest Migration Manager 8.10, we decided to use a single administrative account from target Forest’s root domain and granted all necessary permissions in the domains to run both, Active Directory and Exchange migration. Only for access to source Exchange 2007 when running the move request, we used an account from source domain with Org Admin permissions.

Native Move Job
Setup for Native Move Job

Installation of Migration Manager 8.10. on a member server in target domain (best practice recommendation) including all cumulative hotfixes went smoothly. After successful Directory Synchronization, we connected to the Exchange source and target Organization and finally deployed 2 Instances of the MAgE agent for native mailbox move jobs on our agent host and console server. Note: For agent hosts Windows 2012 R2 is currently (May 2014) not supported. You have to stay with Windows 2008 R2 here.

Problem:

However, after starting the agent services running with our administrative account , we recognized, that we could not open the log file of the agent in the Log Panel inside the Migration Manager for Exchange GUI. We searched for the log file and found it in “c:\progamdata\quest software\Migration Agent for Exchange\NativeMove directory”.

scp not found
Log snippet from MAgE agent

The log file showed that the agent was not starting to process the migration collection due to missing settings and then went to sleep. The lines of error:


Waiting for agent settings: Not found: (&(objectClass=serviceConnectionPoint) …..

Agent is not ready to start. Agent going to sleep at 1 minute.

repeated over and over.

Obviously the agent tried to execute an LDAP query to find a connection point in Active Directory.
Note: Currently QMM 8.10 uses 3 different systems to store configuration data: An ADLDS server, a SQL Server Instance and the Active Directory (ADDS).

Service Connection Point (SCP):

We ran the query which was shown in the log file against the target domain and we could find the Service Connection Point (SCP) immediately in the System container of the domain naming context.

QMM_8.10_SCP

The Service Connection Point consists primarily of the keywords array attribute and the serviceBindingInformation attribute. The QMM MAgE looks for the serviceBindingInformation attribute to get its SQL connection properties. In SQL it will finally find all information to process the collection.
QMM_8.10_SCP_3
We do not know why Developers at Dell Software made this process so complex. However, in our setup the agent could not find the Service Connection Point, because the agent was looking in the domain, where its service account was located and this was the root domain of the forest while the agent host had installed the SCP during installation in the child domain where the computer account was member of.

Solution:

Switching the agent host and agent service account to an account from child domain would have been a solution, but was not in compliance with customer policy to host all system accounts in root domain.
Moving agent host and console to root domain would not have meet best practices and would have interfered running directory synchronization.

So we ended up in giving the agent just what it requested:
We manually created a Service Connection Point in the root domain and copied all serviceBindingInformation values over.

The agent started immediately and worked without errors.

For future design we can only recommend to store Service Connection Point in the Configuration Partition as Exchange and lots of other software. Using the domain naming context will always lead to problems in a big Enterprise environment with Active Directory consisting of multiple domains in a  forest.